Grano Dust for Artificial Grass: Is It the Right Base Material?
Quick Answer: Can You Use Grano Dust Under Artificial Grass?
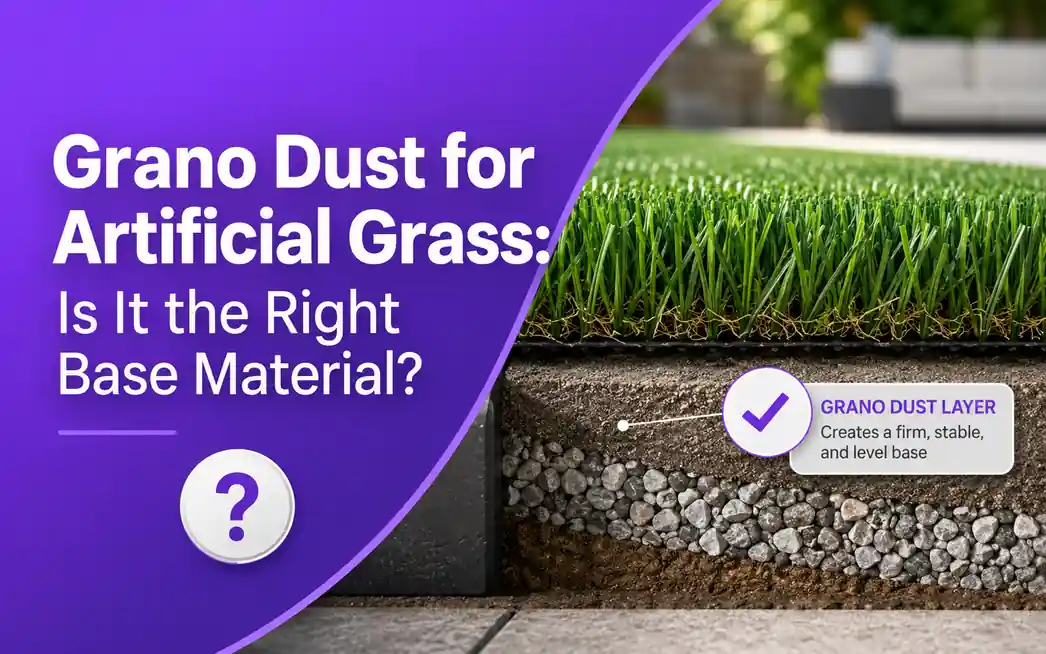
Yes, grano dust can be used under artificial grass, but it is best used as the final compacted laying course, not as the only base layer.
For a strong artificial lawn, grano dust usually sits above a compacted sub-base such as MOT Type 1, crushed stone, or another suitable drainage aggregate. Its job is to create a smooth, firm, level surface directly beneath the artificial grass.
In simple terms:
| Layer | Main Purpose |
|---|---|
| MOT Type 1 / aggregate | Strength and stability |
| Grano dust | Smooth compacted laying course |
| Artificial grass | Finished surface |
Granite dust is often preferred over sharp sand because it binds together well and can provide a firmer laying course. Checkatrade notes that granite dust is generally favoured for artificial grass because it binds better, retains less moisture, and offers better drainage than sharp sand in many installations.
So, if you want the short answer:
Use grano dust as the smooth top layer below artificial grass, but do not rely on it alone if the ground needs a proper structural sub-base.
What Is Grano Dust?
Grano dust, also called granite dust, granolithic dust, or sometimes 6mm to dust, is a fine crushed aggregate made from granite or similar stone. In artificial grass installation, it is commonly used as the final layer above the main sub-base.
It is popular because it can be:
- Spread evenly
- Screeded flat
- Compacted firmly
- Used to create a smooth surface before laying artificial turf
NeoGrass describes 0–6mm granite dust, or grano, as the material used to form the laying course in an artificial grass installation.
Grano Dust vs Granite Dust: Are They the Same?
In many landscaping and artificial grass guides, grano dust and granite dust are used almost interchangeably. The exact material can vary slightly by supplier, but for artificial grass, the key requirement is that the material should be a fine, compactable aggregate, usually around 0–6mm.
The most important thing is not the name on the bag. It is whether the material is:
- Fine enough to screed
- Strong enough to compact
- Suitable for outdoor use
- Free-draining enough for your garden conditions
- Supplied by a reliable aggregate or landscaping merchant
Why Use Grano Dust Under Artificial Grass?
Grano dust is used because artificial grass needs a stable and smooth surface underneath it. If the base is soft, uneven, or poorly compacted, the grass can develop dips, ripples, puddles, and loose edges over time.
A good grano dust layer helps with:
- Levelling: It creates a smooth surface before the turf is rolled out.
- Compaction: It binds together better than loose sand when compacted properly.
- Stability: It reduces the chance of movement under the grass.
- Finish quality: It helps the artificial lawn look flatter and neater.
- Drainage support: When used with the right sub-base, it can help water pass through the lawn system.
However, grano dust is not magic. It cannot fix poor ground preparation, weak soil, bad drainage, or missing edging. It performs best when the layers underneath it are also installed correctly.
Is Grano Dust a Sub-Base or a Laying Course?
This is where many DIY installers get confused.
Technically, grano dust is usually the laying course, not the main structural sub-base.
Sub-Base
The sub-base is the stronger layer underneath. It supports the lawn and helps prevent sinking. Common sub-base materials include:
- MOT Type 1
- Crushed stone
- Crushed concrete
- Limestone chippings
- Granite chippings
Laying Course
The laying course is the smoother layer directly below the artificial grass. This is where grano dust is commonly used.
A strong installation often looks like this:
- Compacted soil
- Weed membrane or geotextile
- MOT Type 1 or suitable drainage aggregate
- Compacted grano dust
- Artificial grass
NeoGrass also describes a typical artificial grass installation as including weed membrane, a sub-base such as MOT Type 1, and a laying course of 0–6mm granite dust or grano before the fake turf is installed.
Recommended Base Layers for Artificial Grass
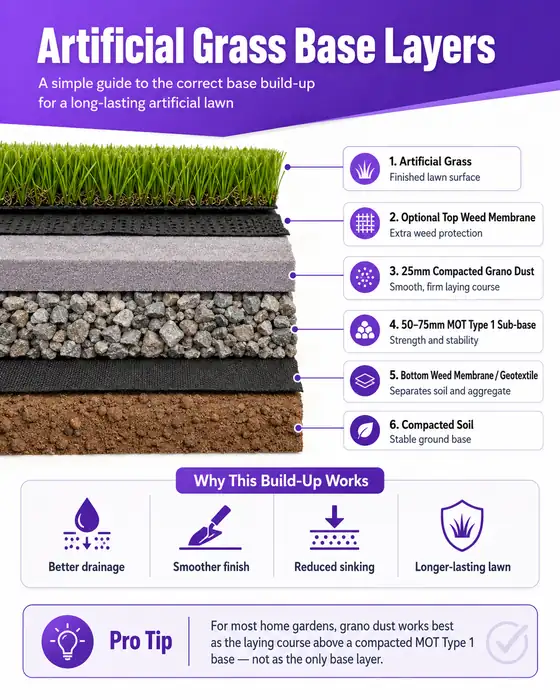
Here is a simple artificial grass base structure for most domestic gardens.
| Layer | Recommended Material | Purpose |
|---|---|---|
| Existing ground | Compacted soil | Supports the whole system |
| Separation layer | Weed membrane/geotextile | Helps separate soil from aggregate |
| Main base | MOT Type 1 or drainage aggregate | Adds strength and stability |
| Laying course | Grano dust/granite dust | Creates smooth compacted finish |
| Surface | Artificial grass | Final lawn surface |
For a standard garden, the base should be planned before any turf is ordered. The grass itself is only the visible layer. The long-term performance depends heavily on what is underneath.
How Deep Should Grano Dust Be for Artificial Grass?
For many domestic artificial grass installations, a 25mm grano dust layer is a common recommendation. NeoGrass recommends installing a 25mm, or 1 inch, laying course of granite dust and compacting it with a vibrating plate compactor.
However, the right depth can depend on your garden, foot traffic, drainage, and the condition of the sub-base.
Suggested Grano Dust Depth by Use Case
| Use Case | Suggested Grano Dust Depth | Notes |
|---|---|---|
| Decorative lawn | 15–25mm | Suitable for low foot traffic |
| Standard domestic garden | Around 25mm | Good general target |
| Family garden | 25–40mm | Use with a strong compacted sub-base |
| Pet-friendly lawn | Around 25–30mm | Drainage matters more than extra dust depth |
| Uneven ground | Do not rely on dust alone | Correct levels with sub-base first |
| Heavy-use area | 25mm+ over stronger base | May need deeper MOT Type 1 layer |
Is 15mm Enough?
A 15mm layer may work for very light-use areas if the sub-base is already flat and stable. Some installation guides mention roughly 15mm of sharp sand or dust granite above a hard base. Grass Direct, for example, recommends around 50–75mm of MOT Type 1 or limestone chipping, followed by roughly 15mm of sharp sand or dust granite.
For most homeowners, though, 25mm is a safer and more practical target because it gives enough material to level and compact properly.
Is 50mm Too Much?
A 50mm grano dust layer is not always wrong, but it should not be used as a shortcut for proper ground preparation.
If the ground is uneven, soft, or low, the better approach is usually to build up the structural layer underneath rather than relying on a thick layer of dust. A deep layer of grano dust may move or compact unevenly if the sub-base below is weak.
Grano Dust vs Sharp Sand vs MOT Type 1
Many people search for grano dust because they are comparing it with sharp sand or MOT Type 1. The key point is that these materials do different jobs.
| Material | Best Used For | Strength | Drainage | Best Situation |
|---|---|---|---|---|
| Grano dust | Laying course | Medium | Good when installed correctly | Standard artificial grass finish |
| Sharp sand | Budget laying course | Low to medium | Moderate | Decorative/light-use lawns |
| MOT Type 1 | Main structural sub-base | High | Moderate | Strength and stability |
| Limestone dust | Laying course alternative | Medium | Good when compacted | Where granite dust is hard to source |
| Granite chippings | Drainage layer | High | High | Wet gardens or pet areas |
Is Grano Dust Better Than Sharp Sand?
For most domestic artificial grass projects, grano dust is usually the better long-term choice. Sharp sand can be used, especially for small or decorative areas, but grano dust generally creates a firmer and more stable laying course.
Sharp sand is often cheaper and easier to find, but it can shift more easily if the base is not compacted well. Grano dust binds more firmly when compacted, which makes it a better choice for lawns that will receive regular use.
Do You Still Need MOT Type 1?
In many cases, yes.
MOT Type 1 or a similar compacted aggregate gives the artificial grass base its strength. Grano dust gives the smooth final surface. They are not the same thing.
Artificial Grass Direct says MOT Type 1 is appropriate where a hard, flat surface is needed and notes that sports surfaces such as football pitches, tennis courts, and multi-use games areas require an MOT Type 1 sub-base layer with a grano layer on top.
For most home gardens, the exact depth may vary, but the principle stays the same:
Use a strong sub-base for support, then use grano dust for the smooth laying course.
Grano Dust vs Limestone Dust
Limestone dust can also be used as a laying course under artificial grass. Some installers use granite dust, while others use limestone dust depending on local availability and price.
Both materials can work if they are:
- Fine enough to screed
- Suitable for compaction
- Installed at the right depth
- Laid over a stable sub-base
- Not used to hide poor ground preparation
If both are available locally, grano dust is often preferred because it is widely discussed in artificial grass installation guides and is known for creating a firm laying surface. But limestone dust can still be a practical alternative when supplied in the right grading.
How to Install Grano Dust Under Artificial Grass
Below is a practical step-by-step installation process for a typical garden.
Step 1: Plan the Finished Height
Before digging, decide where the finished grass level should sit. Check nearby:
- Patios
- Paths
- Door thresholds
- Drain covers
- Garden edging
- Fences or walls
The finished artificial grass should not sit too high against walls, air bricks, or damp-proof courses. It should also not create a trip hazard against paving.
Step 2: Remove the Existing Lawn or Soil
Remove the existing grass, roots, weeds, and soft organic material. If old turf and roots are left underneath, they can rot and create soft spots.
Excavate to a depth for:
- The sub-base
- The grano dust laying course
- The artificial grass thickness
For many standard domestic lawns, this may involve removing around 75–100mm below the planned finished level, but the exact depth depends on the base specification and grass thickness.
Step 3: Compact the Soil
Once the area is excavated, compact the soil. The ground should be firm but not sealed like concrete. If the soil is very soft, wet, or clay-heavy, drainage may need extra attention before the base layers go in.
Use a vibrating plate compactor where possible. For very small areas, a hand tamper may work, but a compactor gives a better finish.
Step 4: Install Edging Restraint
Do not skip edging. Artificial grass needs a firm edge to stop the base and turf from moving.
Common edging options include:
- Treated timber
- Composite edging
- Concrete haunching
- Existing paving edges
- Metal edging
- Plastic landscape edging
Good edging helps hold the grano dust in place and gives you something secure to fix the artificial grass to.
Step 5: Lay a Weed Membrane or Geotextile
A permeable weed membrane can help separate the soil from the aggregate layer and reduce weed growth.
Important: Do not use solid plastic sheeting because it can block drainage.
For most installations, a bottom membrane is useful between the soil and sub-base. Some installers also use a second membrane above the laying course, directly below the artificial grass. This can help with weed control, but for dog areas, drainage and odour control should be considered carefully.
NeoGrass says a second layer of weed membrane can be installed on top of the laying course directly beneath artificial grass as an extra line of defence.
Step 6: Add and Compact the MOT Type 1 Layer
Spread MOT Type 1 or your chosen sub-base material evenly across the area. Rake it level, then compact it with a wacker plate.
Typical domestic guidance often falls around:
- 50mm for light or standard use
- 75mm for heavier family use
- More specialist design for sports, commercial, poor-drainage, or heavily trafficked areas
The sub-base should feel firm and stable before you add grano dust.
Step 7: Add the Grano Dust Layer
Spread grano dust across the compacted sub-base.
For most domestic lawns, aim for around 25mm compacted depth. Use a rake to spread the dust evenly, then use a straight edge or screeding rail to level it.
Do not use grano dust to hide large dips in the MOT Type 1 layer. Fix the structural base first, then use grano dust for the final smooth finish.
Step 8: Lightly Mist Before Compacting
If the grano dust is very dry, lightly spray it with water before compacting. Do not soak it. A light mist helps the fine particles bind together and reduces airborne dust.
NeoGrass recommends lightly spraying granite dust before using a plate compactor because it helps the dust bind together and reduces dust becoming airborne.
Step 9: Compact in More Than One Direction
Use the plate compactor across the full area. For better compaction, go:
- Up and down
- Side to side
- Across edges and corners carefully
NeoGrass also recommends guiding the plate compactor both up and down and from side to side across the full lawn surface.
Step 10: Screed and Check the Levels
After compaction, check the surface carefully.
Look for:
- Dips
- Ridges
- Soft spots
- Low edges
- High corners
- Areas where water may sit
Use a long straight edge to check the surface. Make small adjustments before laying the turf. Once the artificial grass is down, fixing base problems becomes much harder.
Step 11: Lay the Artificial Grass
Roll the grass out and allow it to settle. Align the pile direction before cutting. Trim carefully around edges and obstacles.
Then secure the artificial grass using the correct method for your edging system. For joins, use proper joining tape and adhesive. Brush the fibres upright once installed.
How Much Grano Dust Do You Need?
The amount of grano dust depends on three things:
- The size of the lawn
- The depth of the grano dust layer
- The density and compaction allowance
Simple Formula
Use this formula:
Area × depth = volume
For metric measurements:
Square metres × depth in metres = cubic metres
Then convert cubic metres into tonnes:
Cubic metres × material density = tonnes required
Granite dust calculators commonly use around 1.50 tonnes per cubic metre as an approximate density. Gravel Base lists granite dust density as 1.50 t/m³.
Example Calculation
Let’s say your artificial grass area is:
- Length: 5m
- Width: 4m
- Area: 20m²
- Grano dust depth: 25mm
Convert 25mm into metres:
25mm = 0.025m
Now calculate the volume:
20m² × 0.025m = 0.5m³
Convert to tonnes using 1.50 t/m³:
0.5m³ × 1.50 = 0.75 tonnes
Add 10–15% allowance for compaction, levelling, and waste:
Approximate order amount: 0.83–0.86 tonnes
So, for a 20m² area at 25mm depth, you may need roughly 0.75 tonnes before allowance, or around 0.85 tonnes after allowance.
Use a Grano Dust Calculator
Manual calculations are useful, but they can become confusing when your garden is irregular, your depth changes, or you need to convert tonnes into bags.
To avoid guessing, use this grano dust calculator to estimate the volume and weight you need based on your lawn size and chosen depth.
A good calculator should help you work out:
- Total lawn area
- Grano dust volume in cubic metres
- Estimated weight in tonnes or kilograms
- Number of 20kg or 25kg bags
- Number of bulk bags
- Extra allowance for compaction and waste
This is especially helpful before ordering materials because under-ordering can delay the project, while over-ordering can leave you with heavy waste to remove.
How Much Grano Dust Per Square Metre?
As a rough guide:
| Grano Dust Depth | Volume Per 1m² | Approx Weight Per 1m² |
|---|---|---|
| 15mm | 0.015m³ | 22.5kg |
| 20mm | 0.020m³ | 30kg |
| 25mm | 0.025m³ | 37.5kg |
| 30mm | 0.030m³ | 45kg |
| 40mm | 0.040m³ | 60kg |
| 50mm | 0.050m³ | 75kg |
These figures use an approximate density of 1.50 tonnes per cubic metre. Always check with your supplier because moisture content, grading, and compaction can affect the final weight.
Pros and Cons of Grano Dust for Artificial Grass
Pros
| Benefit | Why It Matters |
|---|---|
| Creates a smooth finish | Helps artificial grass sit flat |
| Compacts well | Reduces movement under the turf |
| More stable than sharp sand | Better for regular-use gardens |
| Good for levelling | Useful for final surface preparation |
| Works with MOT Type 1 | Completes a strong base system |
| Suitable for many domestic lawns | Practical for homeowners and installers |
Cons
| Limitation | Why It Matters |
|---|---|
| Not a full structural base by itself | It should usually sit above stronger aggregate |
| Needs compaction | Loose dust can move or settle |
| Can be dusty when dry | Light misting helps before compaction |
| Does not solve drainage alone | Wet gardens may need better drainage layers |
| Can fail if too thick over weak ground | Fix the sub-base first |
When You Should Not Use Grano Dust Alone
Grano dust should not be used as a quick fix for poor ground conditions.
Avoid using grano dust alone if:
- The ground is soft or unstable
- The garden has standing water
- The soil is heavy clay with poor drainage
- You need to raise levels significantly
- The lawn will get heavy use
- There is no proper edging restraint
- You are installing over an area that needs structural support
- The base underneath has not been compacted
In these situations, grano dust can still be part of the system, but it should be used above a stronger sub-base or drainage layer.
Drainage: Does Grano Dust Drain Well?
Grano dust can support good drainage when it is installed as part of the right base system. However, drainage depends on the full build-up, not just the dust layer.
Important drainage factors include:
- Soil type
- Excavation depth
- Sub-base material
- Compaction level
- Slope or fall
- Membrane type
- Pet use
- Nearby hard surfaces
If your garden already holds water, grano dust alone will not solve the problem. You may need a more open drainage aggregate, a soakaway, drainage channels, or professional landscaping advice.
For pet-friendly lawns, drainage is especially important because dog urine needs to pass through the surface and base rather than sitting near the top. Grass Direct recommends using limestone chipping instead of standard MOT Type 1 in gardens with poor drainage or pets, followed by a dust granite or sand layer.
Weed Membrane Placement: Above or Below Granular Dust?
There are two possible positions:
Option 1: Weed Membrane Below the Sub-Base
This is a common choice. The membrane sits between the soil and aggregate. It helps separate the ground from the base and reduces weed growth from below.
Best for:
- Standard gardens
- Soil separation
- Basic weed control
- Keeping aggregate cleaner
Option 2: Weed Membrane Above the Laying Course
Some installers also place a second permeable membrane above the grano dust and directly under the artificial grass.
Best for:
- Extra weed control
- Cleaner turf backing
- Reducing surface weed growth
Important Note for Dog Owners
For dog-friendly artificial grass, avoid creating a layer that traps urine near the surface. Always use a permeable membrane and think carefully about drainage and odour control.
7 Common Mistakes When Using Grano Dust
1. Using Grano Dust as the Only Base
Grano dust is a laying course. It should not normally replace a proper sub-base where strength is needed.
Better approach: Use MOT Type 1 or drainage aggregate underneath, then grano dust on top.
2. Not Compacting the Base
Loose dust will settle over time. That can create dips and uneven areas.
Better approach: Compact the soil, compact the sub-base, then compact the grano dust.
3. Using Too Little Material
A very thin layer may not give enough material for proper screeding.
Better approach: Use around 25mm for most standard installations.
4. Using Too Much Grano Dust Over Weak Ground
A thick layer of dust can still move if the ground below is unstable.
Better approach: Correct low areas with the structural sub-base first.
5. Skipping Edging
Without edging, the base and grass can move at the sides.
Better approach: Install timber, composite, concrete, metal, or other firm edging before finishing the laying course.
6. Blocking Drainage
Non-permeable plastic sheeting can trap water.
Better approach: Use permeable weed membrane or geotextile designed for landscaping.
7. Ignoring Falls
A perfectly flat garden may still hold water if there is nowhere for rain to go.
Better approach: Create a slight fall away from buildings and towards a safe drainage area.
Professional Tips for a Better Finish
Use these practical tips for a cleaner and longer-lasting artificial grass base:
- Do not rush the base. The grass only looks as good as the surface underneath.
- Compact every layer. Soil, sub-base, and grano dust should all be firm.
- Mist grano dust lightly before compaction. This helps reduce dust and improve binding.
- Use a straight edge. A rake alone is not enough for a smooth final level.
- Check edges carefully. Most visible failures start around perimeters and joins.
- Keep the final height in mind. Do not accidentally raise the grass above patio or path level.
- Order a little extra. Compaction and small level corrections usually require more material than the exact calculation.
- Plan drainage before laying turf. Do not wait until puddles appear after installation.
- Use the right membrane. It must allow water to pass through.
- Do not hide problems with dust. Fix poor sub-base preparation before laying the final course.
Cost and Maintenance Considerations
Granodust may cost slightly more than sharp sand in some areas, but it can be worth it if it helps create a firmer, more stable base.
The highest cost in artificial grass installation is often not the dust itself. It is usually the labour, excavation, waste removal, sub-base material, edging, turf, joins, and finishing work.
A good grano dust layer can reduce future problems such as:
- Dips
- Ripples
- Loose edges
- Uneven joins
- Water pooling
- Rework
In other words, the cheapest base is not always the cheapest long-term option.
Best Base Setup for Different Garden Types
| Garden Type | Recommended Base Approach |
|---|---|
| Small decorative lawn | Compacted soil, membrane, grano dust or sand, artificial grass |
| Standard family garden | Membrane, MOT Type 1, 25mm grano dust, artificial grass |
| Pet-friendly garden | Drainage-focused aggregate, grano dust, careful membrane placement |
| Poor drainage garden | Specialist drainage layer or chippings, not grano dust alone |
| Heavy-use play area | Deeper compacted sub-base, grano dust laying course |
| Sloped garden | Firm edging, compacted base, controlled fall and drainage route |
| Existing concrete/patio | Repair surface first; may need shockpad or drainage holes, not standard grano base |
Visual Guide: Artificial Grass Base Layers
A useful base diagram would show the layers in this order:
- Artificial grass
- Optional permeable top weed membrane
- 25mm compacted grano dust
- 50–75mm MOT Type 1 or drainage aggregate
- Bottom weed membrane/geotextile
- Compacted soil
Suggested image alt text:
“Artificial grass base layer diagram showing grano dust laying course above MOT Type 1 sub-base and weed membrane.”
Final Recommendation
Granodust is a strong choice for artificial grass when used correctly. It is best used as the smooth compacted laying course directly underneath the turf, usually above a firm sub-base such as MOT Type 1 or another suitable aggregate.
For most domestic gardens, a good target is:
- 50–75mm compacted sub-base
- Around 25mm compacted grano dust
- Permeable weed membrane
- Secure edging
- Proper compaction at every layer
Choose grano dust over sharp sand if you want a firmer, more stable, and more professional finish. But do not use it as a shortcut for poor excavation, weak ground, or drainage problems.
If you are planning your project, measure the area first, decide your laying-course depth, then calculate the quantity before ordering. This will help you avoid delays, wasted money, and an uneven artificial lawn.
FAQs
Can you use grano dust under artificial grass?
Yes. Grano dust is commonly used as the compacted laying course directly below artificial grass. It is usually installed above a stronger sub-base such as MOT Type 1.
How deep should grano dust be under artificial grass?
Around 25mm is a common recommendation for many domestic artificial grass installations. Some lighter-use areas may use less, while heavier-use areas may need careful base preparation underneath.
Do I need MOT Type 1 under grano dust?
For many standard garden installations, MOT Type 1 or another compacted aggregate is recommended below the grano dust. It provides the main strength and stability.
Does grano dust drain well?
Grano dust can support drainage when installed correctly, but drainage depends on the whole base system. Poor soil, blocked membranes, or incorrect falls can still cause water problems.
Should grano dust be compacted?
Yes. Grano dust should be compacted with a vibrating plate compactor or wacker plate. Loose grano dust can settle and create uneven areas under the artificial grass.
Should I wet grano dust before compacting?
Lightly misting grano dust before compacting can help it bind and reduce dust. Do not soak it, as too much water can make levelling harder.
Can grano dust stop artificial grass from sinking?
Grano dust can help create a firm laying surface, but it will not stop sinking if the soil or sub-base underneath is weak. Proper excavation, sub-base installation, edging, and compaction are all important.